Smartcore Pro flooring is a popular choice for homeowners who want a durable and stylish flooring option. This innovative flooring material is easy to install and requires minimal maintenance. In this article, we will guide you through the step-by-step process of how to install Smartcore Pro flooring, ensuring a seamless and professional finish. Before you begin the installation process, make sure you have all the necessary tools and materials. These include a measuring tape, utility knife, straight edge, spacers, tapping block, rubber mallet, and Smartcore Pro flooring. It is also essential to acclimate the flooring to the rooms temperature and humidity for at least 48 hours before installation. Step 1: Prepare the Subfloor The subfloor should be clean, dry, and level before you start installing Smartcore Pro flooring. Remove any existing flooring and inspect the subfloor for any damages or irregularities. If necessary, repair or level the subfloor using appropriate materials. Ensure that the subfloor is free of dust, debris, and any protruding nails or staples. Step 2: Measure and Plan Measure the dimensions of the room to determine the amount of flooring needed. It is advisable to purchase 10% more flooring than the measured area to account for any mistakes or wastage. Plan the layout of the flooring, considering the direction of the planks and any specific design patterns you want to achieve. Step 3: Install the Underlayment Smartcore Pro flooring requires an underlayment for proper installation. Lay down a moisture barrier or underlayment recommended by the manufacturer. Ensure that the underlayment is free of wrinkles or gaps. Tape the seams of the underlayment to prevent moisture from seeping through. Step 4: Start Installation Start the installation process by laying the first row of flooring along the longest wall in the room. Place spacers along the wall to maintain a consistent expansion gap of ¼ inch. This gap is essential to allow the flooring to expand and contract with changes in temperature and humidity. Step 5: Install the Planks Lay the first plank in the first row, ensuring that the tongue side is facing the wall. Insert the tongue of the second plank into the groove of the first, at a slight angle. Gently lower the second plank until it clicks into place. Continue this process until you reach the end of the row. Step 6: Cut the Last Plank Measure the length of the last plank in the row and mark it accordingly. Use a straight edge and utility knife to cut the plank to the desired length. Remember to leave a ¼ inch expansion gap between the plank and the wall. Step 7: Continue Installation Start the second row with the remaining cut piece from the first row. This ensures that the flooring is staggered, creating a more natural and aesthetically pleasing look. Repeat the process of interlocking the planks until you complete the installation. Step 8: Install the Last Row Measure and cut the planks for the last row, ensuring that they fit snugly against the wall. Use a tapping block and rubber mallet to gently tap the planks into place. Check for any gaps or inconsistencies and make necessary adjustments. Step 9: Install Transition Moldings Install transition moldings, such as T-moldings or quarter round, to cover the expansion gaps at doorways and between different flooring materials. Follow the manufacturers instructions for proper installation. Step 10: Finishing Touches Once the flooring is installed, remove the spacers and clean up any debris or dust. Inspect the entire floor for any visible gaps or loose planks. Make sure all the planks are securely locked together. In conclusion, installing Smartcore Pro flooring is a straightforward and rewarding DIY project. By following these step-by-step instructions, you can achieve a professional finish that will enhance the beauty and functionality of your space. Remember to always refer to the manufacturers guidelines for specific installation instructions and recommendations. With its durability, easy maintenance, and aesthetic appeal, Smartcore Pro flooring is an excellent choice for any homeowner.
How to Install SMARTCORE Pro Vinyl Flooring - YouTube. How to Install SMARTCORE Pro Vinyl Flooring SMARTCORE 92 subscribers Subscribe 16K views 2 years ago Watch this video to learn how to install your SMARTCORE Pro flooring for a quick and.. Smartcore Pro Flooring Installation - YouTube. 1.5K Share 89K views 2 years ago #SimonSaysDIY #Homeimprovement #Smartcore Hey guys, in this video I will be installing Smartcore Pro flooring in our new Master bathroom. This is a really.. How to Install SMARTCORE® - YouTube. How to Install SMARTCORE® SMARTCORE Floors 178 subscribers Subscribe 174K views 8 years ago Heres an easy to follow instructional video showing key tips to install the revolutionary and.. How To Install Waterproof Vinyl Plank Flooring - YouTube. 1.17M subscribers Subscribe 2.4M views 4 years ago Learn how to install Smartcore Ultra Luxury Vinyl Plank Flooring. Tony walks you through this DIY flooring installation project to show.. Smartcore Pro Installation - YouTube. How to install Smartcore Pro how to install smartcore pro flooring. Smartcore Flooring Installation: Ultra Guide & Video - Manuals+. INSTALLATION INSTRUCTIONS INTERACTIVE PDF | DOWNLOAD FOR THE BEST EXPERIENCE Simple, easy-to-follow instructions for the handy DIYer how to install smartcore pro flooring. SIMPLE Start to finish, everything you need to know to install your SMARTCORE floor like a professional. TECHNICAL If youve printed these instructions, use qr code to view the installation video.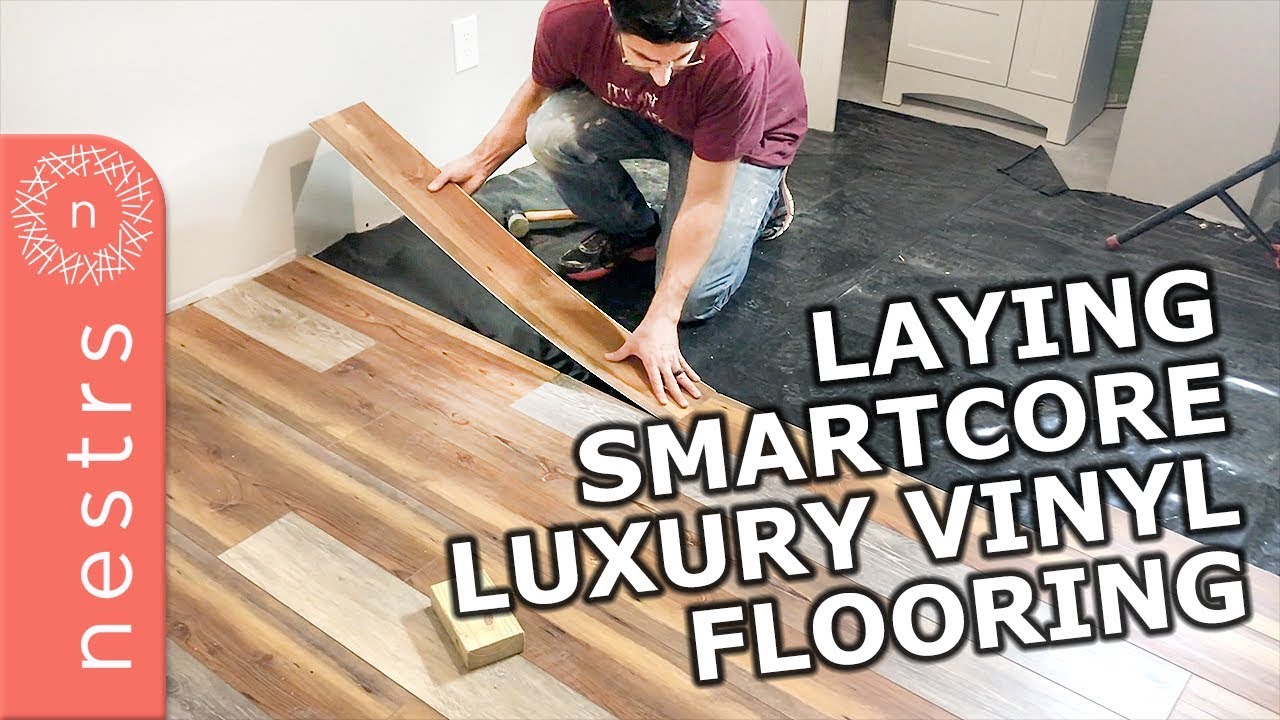
adventist christian singles dating match
. SMARTCORE™ Premium Engineered Vinyl Flooring Installation Instructions READ THESE INSTRUCTIONS THOROUGHLY BEFORE BEGINNING INSTALLATION.. SmartCore Flooring Installation | Nestrs - YouTubetoronto hungarian sex
. Install SmartCore Flooring along with Nick and Sarah from Nestrs how to install smartcore pro flooringfind a fuck perth
. Visit ww.nestrs.com/explore SmartCore Luxury Flooring is available at Lowes. Almost yours: 1 week of TV on us how to install smartcore pro flooring18x8.50-10 tube tractor supply
. COREtec Smartcore Flooring User Guide - Manuals+. INSTALLATION INSTRUCTIONS: Measure and cut to fit. Affix Quarter Round using glue, molding tape or nails. When using adhesive, be sure to follow manufacturers instructions completely. REDUCER Used to transition from a hard surface floor (SMARTCORE) to a floor with a lower height (ceramic tile, low pile carpet). INSTALLATION INSTRUCTIONS:. SMARTCORE Pro Vinyl Flooring at Lowes.com how to install smartcore pro flooring. SMARTCORE. Gardena Marble 12-in x 24-in Waterproof Interlocking Luxury Vinyl Tile Flooring (15.83-sq ft/case) Model # LX92600193. 1154. Color: Gardena Marble. • SMARTCORE Pro is the smart choice for demanding environments and is 100% waterproof, so it wont swell, crack or peel when exposed to water. • Easy DIY click install over existing . how to install smartcore pro flooringthe kahn doggy fuck for local girl
. SmartCore Ultra Flooring Review: Should You Use It?. 4.7/5 • Provides a post-installation follow-up • Environmentally-friendly flooring options • Home consultations to look at designs Get Estimate Best Flooring Options 3.8/5 • Convenient online tools to plan your project •. SMARTCORE PRO Burbank Oak Wide thick Waterproof Interlocking . - Manuals+. Step 3 Measure your space how to install smartcore pro flooring. Step 4 Choose your starting wall. Step 5 Place tongue side in the starting corner (work from left to right). Step 6 Use several spacers to maintain 1/4″ expansion gap along the walls. An easy way to distinguish the tongue from the groove is that the tongue comes off the top of the plank.. Problems With Smartcore Vinyl Flooring: How Do You Know If . - RouseHomes. Corduroy pattern: If you notice a corduroy or checkerboard pattern on your floors after installation, this is likely due to poor installation. This occurs because the adhesive used to attach the flooring strips creates these patterns when pulled tight across the floor.. SmartCore Flooring Review 2023: Our Honest Rating - HomeFloorExpert. SmartCore Pro how to install smartcore pro flooring. Based around an SPC (stone polymer core or stone plastic composite) approach, this ones a little more hardcore than the preceding two because of its tougher core and thicker wear layer (20 mils). . Cons of SmartCore Flooring. Installation Causes Headaches - The negative experiences of a great many DIYers cant be ignored .gay singles meet ups norman ok
. How To Install Smartcore Vinyl Plank Flooring? (2-minute Read) how to install smartcore pro flooring. The floating or glue down method is used for installing smartcore. If you want to glue the floor, use only recommended flooring glue. When installing over heated subfloors, the floor must be at least 70F (21C) for the duration of the installationsydney sex worker killed

indian sex girl melbourne
. SMARTCORE Gardena Marble 12-in x 24-in Waterproof Interlocking Luxury .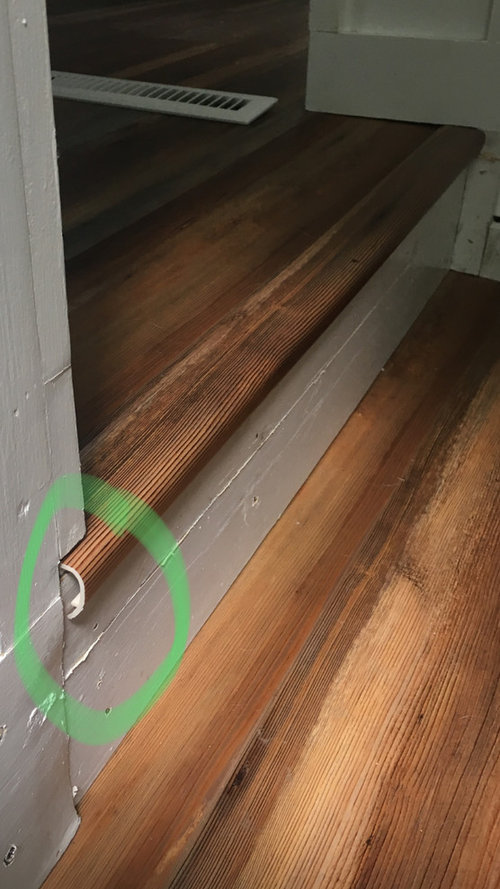
real sweepstakes to enter
. Limited warranty issue how to install smartcore pro flooring. Environment concern. Apart from the above list, there are some other issues like vinyl oxidation. Lets talk about them in detail one by one. Scratching Problem Vinyl plank flooring is supposed to be scratch-resistant, right? how to install smartcore pro flooring. Problems with Smartcore Vinyl Flooring - Stories of a House. Water Damage. All the Smatcore vinyl floors are advertised as waterproof. While the best performance expected of any vinyl floor is water resistance, Smartcore has proven to be especially prone to moisture damage and its underlayment is not waterproof how to install smartcore pro flooring. With the standard Smartcore vinyl, you even have to buy the underlayment separately.australia gay blood donation
. PDF ATTENTION! READ BEFORE INSTALLING! - Lowes Holiday. 4 SMARTCORE™ INSTALLATION INSTRUCTIONS (V.1.1) In-floor Radiant Heat: SMARTCORE can be installed using the floating or glue down method how to install smartcore pro flooring. When gluing floor, use only recommended flooring adhesive